How to Deploy Jenkins with Infrastructure as Code (IaC)
Introduction
Many guides start by showing how to build an application locally, but entirely omit guidance for deploying that application to a production environment – often because each organization has unique needs/preferences for a production deployment.
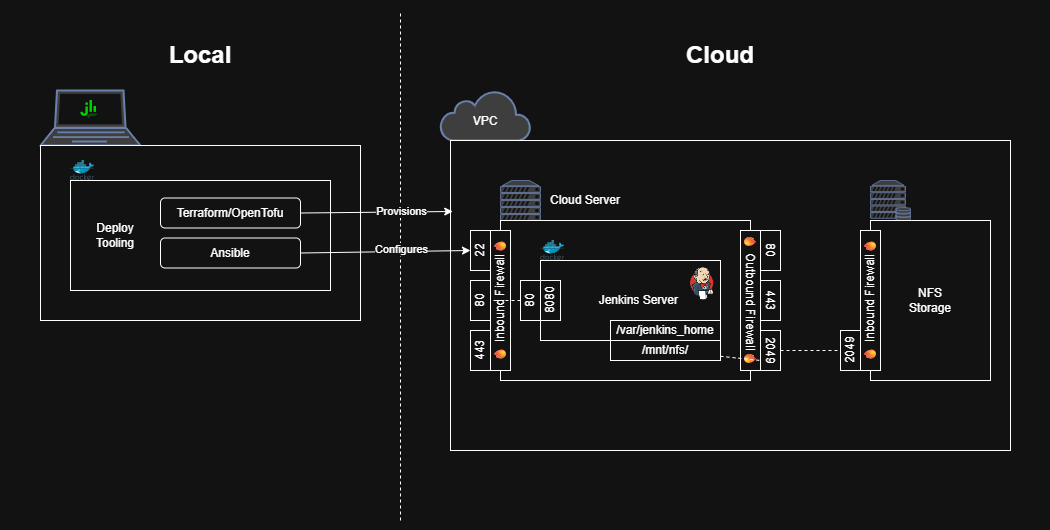
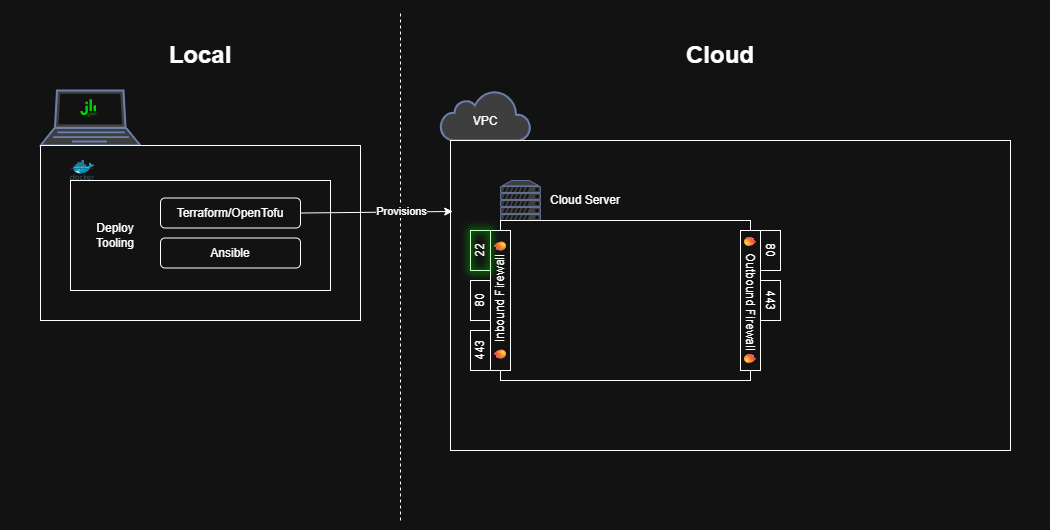
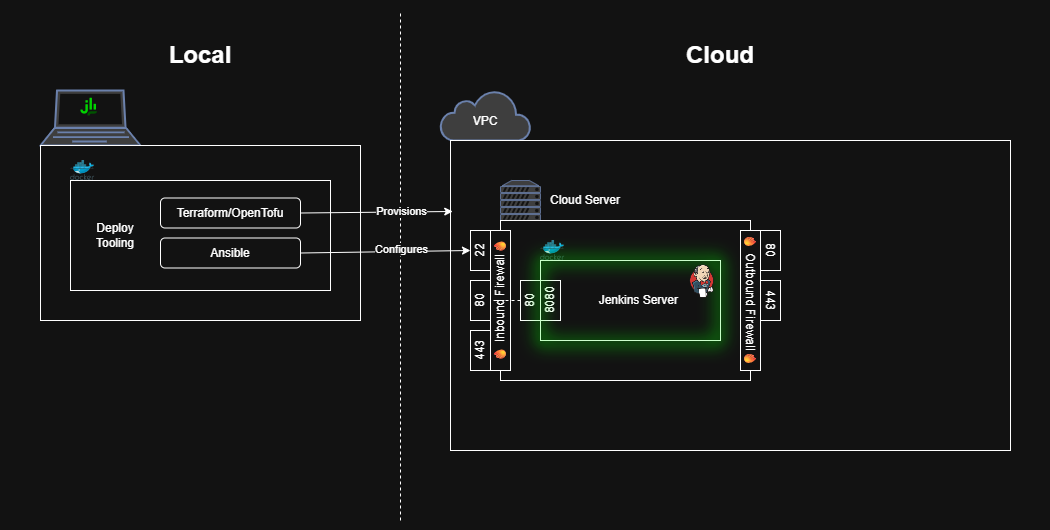
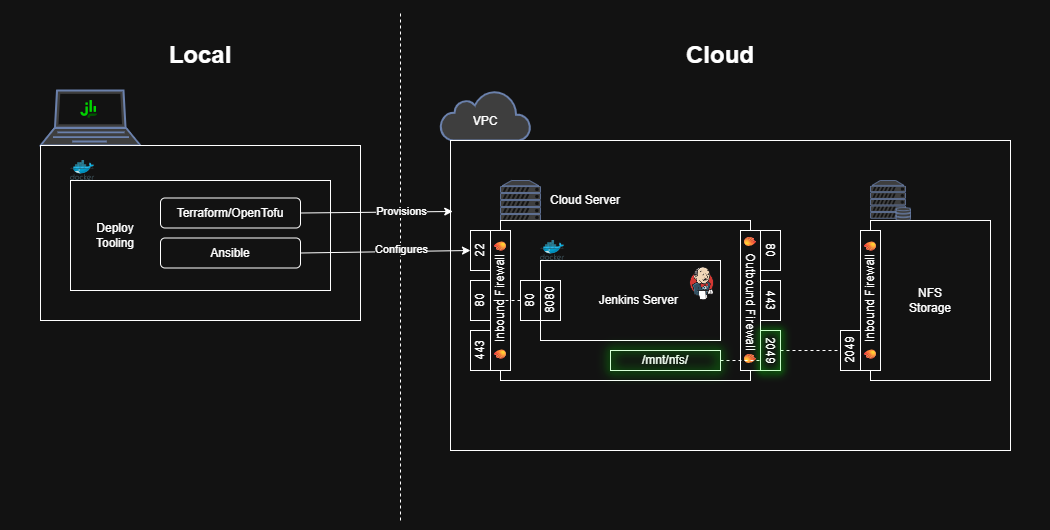
In contrast, this initial guide will create a “walking skeleton” of a production-like Jenkins deployment. In more words, this guide will describe not only how to run Jenkins on your local machine, but also how to configure all the tooling required to provision a cloud server, deploy Jenkins on that server, and make the instance available to the world wide web.
As a result, by the end of this guide, you’ll have a working deployment pipeline for anyone on your team to create, enhance, and maintain a Jenkins instance. Future guides will showcase how to add more feature “muscle” to this “walking skeleton”.
Pre-Requisites
make: A tool for putting common CLI commands in a file.docker: A tool for encapsulating software dependencies in a reproducible format.- A new SSH public/private key pair (e.g. via
ssh-keygen) - A
gitrepository, hosted remotely, with SSH access enabled.- This guide will use GitHub, so follow their instructions for configuring SSH access.
- An account/credentials for a cloud provider.
- This guide will use AWS as the cloud provider, and an Access Key/Secret Access Key for credentials.
Run Jenkins Locally
Let’s start by seeing what Jenkins looks like locally. While there are many ways to install Jenkins, the simplest/fastest one is to run one of the official Jenkins images published on DockerHub.
1
2
3
docker run --rm --name jenkins --publish 8080:8080 jenkins/jenkins:lts-jdk21

# Jenkins is now running at `http://localhost:8080`
How it works
The above command runs the latest stable Jenkins image – indicated by
ltswhich stands for Long Term Support. The Jenkins server runs inside the Docker container on port8080which is thenpublished to port8080on your machine (i.e.external-port:internal-port). The--rmflag tells Docker to clean everything up automatically after stopping the container.See the docs for
docker runto learn more.
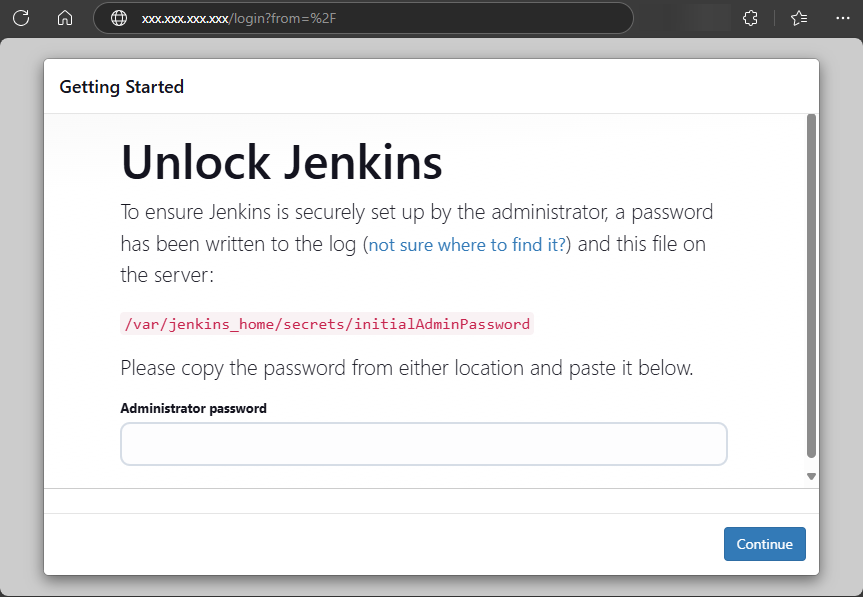
Opening http://localhost:8080 shows the Jenkins setup page.
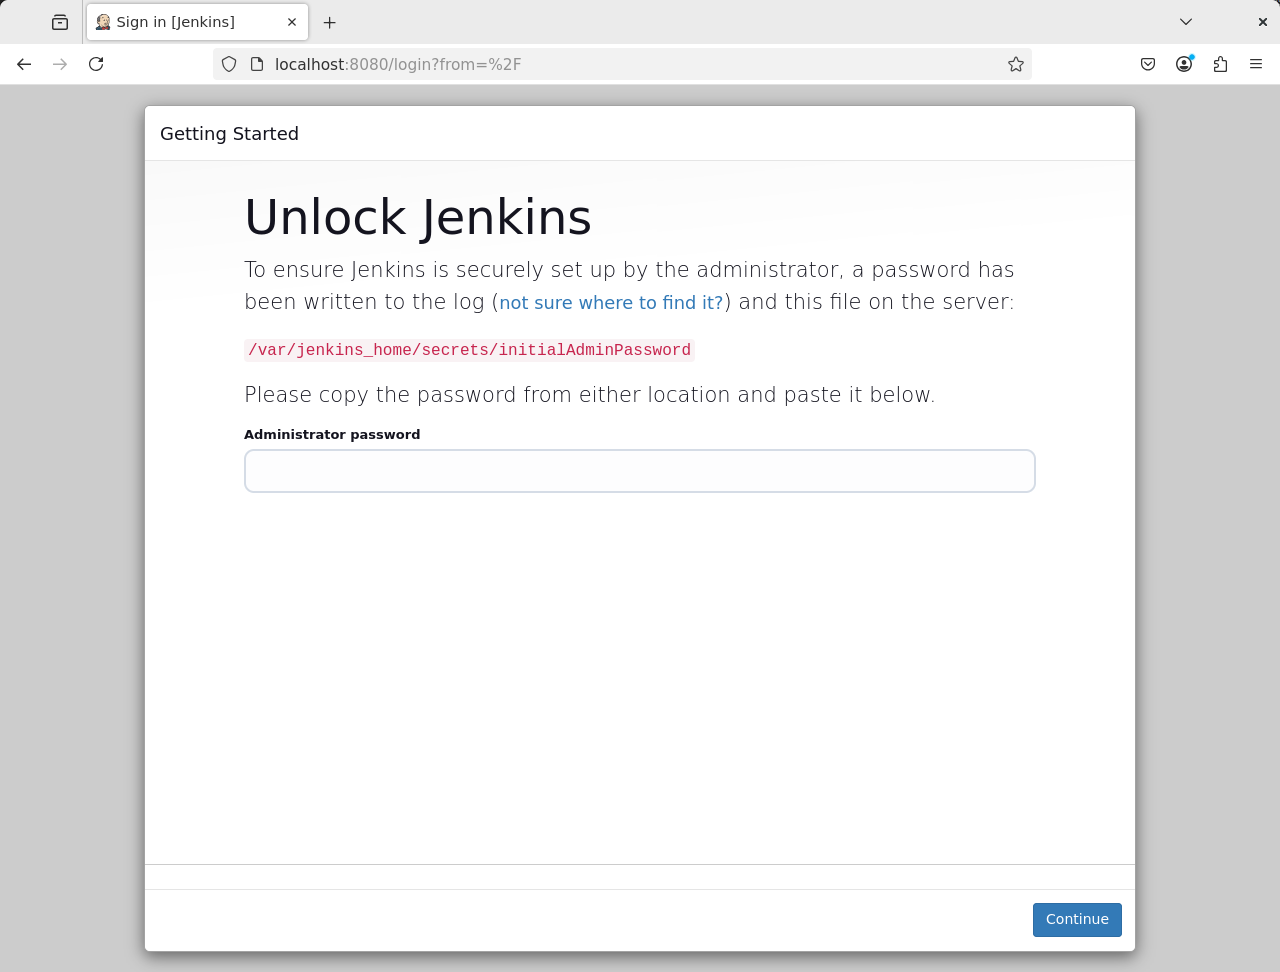
As described on the setup page, you can obtain the initial admin password from the server log or by reading a file in the Docker container (e.g. docker exec jenkins cat /var/jenkins_home/secrets/initialAdminPassword).
Feel free to explore the Jenkins UI for a little bit, but don’t get too attached because nothing is persisted.
Clean everything up with docker stop jenkins.
Configuring Deployment Tooling
A local Jenkins server is fun to play around with, but it’s much more useful when deployed somewhere others can access.
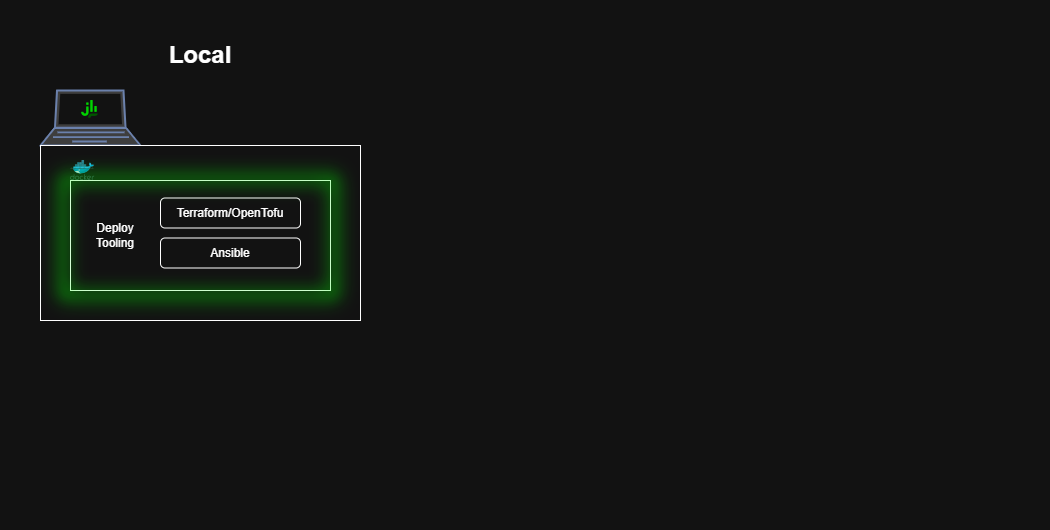
Package Deployment Tools into a Docker Image
Deploying a server to a cloud service requires many additional tools beyond those listed in the pre-requisites. Fortunately, those tools can be packaged into a Docker image so that you don’t have to figure out how to install them on your local machine.
Of course, you could install all these tools locally, but choosing to use a Docker image also means that team members and CI environments can run deployments using the exact same environment.
deploy/Dockerfile
1
2
3
4
5
6
7
8
9
10
11
12
13
14
15
16
17
18
19
20
21
22
23
24
25
26
27
28
29
30
31
32
33
34
35
36
37
38
39
40
41
42
43
44
############################################################
##  Tools required to run a deployment
############################################################
FROM python:3.13-slim

## Install `curl`
RUN apt update \
    && apt install -y --no-install-recommends curl ca-certificates \
    && rm -rf /var/lib/apt/lists/*

## Install `ssh` client
RUN apt update \
    && apt install -y --no-install-recommends openssh-client \
    && rm -rf /var/lib/apt/lists/*

## Install `tofu` as `terraform`
RUN curl -L --output /tmp/tofu.deb https://github.com/opentofu/opentofu/releases/download/v1.9.0/tofu_1.9.0_amd64.deb \
    && apt install /tmp/tofu.deb \
    && mv $(which tofu) /usr/bin/terraform

## Install `terraform-backend-git`
RUN curl -L --output /tmp/terraform-backend-git https://github.com/plumber-cd/terraform-backend-git/releases/download/v0.1.6/terraform-backend-git-linux-amd64 \
    && chmod +x /tmp/terraform-backend-git \
    && mv /tmp/terraform-backend-git /usr/bin/terraform-backend-git

## Install `ansible`
RUN apt update \
    && apt install -y python3-pip \
    && rm -rf /var/lib/apt/lists/*
RUN pip install --upgrade pip \
    && pip install ansible==11.2.0 \
    && pip cache purge
# Install common `ansible` dependencies`
#  - `rsync` (required by ansible.posix.synchronize)
RUN apt update \
    && apt install -y rsync \
    && rm -rf /var/lib/apt/lists/*

## Create a lower-privilege user for runtime
RUN useradd -m ubuntu
USER ubuntu
WORKDIR /home/ubuntu

CMD [ "tail", "-f", "/dev/null" ]
The Toolbox
curl - Make HTTP requests from the command line.
openssh-client - Secure connections to other computers/servers.
OpenTofu - Enables “Infrastructure as Code”, i.e. provisioning cloud infrastructure from version-controllable config files.
- OpenTofu is an open-source, drop-in replacement for Terraform. This guide recommends OpenTofu because Terraform recently switched from open-source to merely source-available.
- From now on, this guide will use the terms “OpenTofu” and “Terraform” interchangeably.
terraform-backend-git - Enables storing the sensitive Terraform “state files” (explained later on) in a Git repository.
Ansible - Enables configuring applications on other computers (e.g. cloud servers provisioned via Terraform).
Build and Run the Deployment Tools Image
Create a Makefile with the following contents.
Makefile
1
2
3
4
5
6
7
8
9
.PHONY: *

build-deploy-image:
	cd deploy && docker build --tag deploy .

info: build-deploy-image
	docker run --rm --name deploy deploy ansible --version
	docker run --rm --name deploy deploy terraform --version
	docker run --rm --name deploy deploy terraform-backend-git --help
Now run make info to build the Docker image and see each key tool’s version information printed to the console.
Example output of `make info`
``` $ make info docker run --rm --name deploy deploy ansible --version ansible [core 2.18.4] config file = None configured module search path = ['/home/ubuntu/.ansible/plugins/modules', '/usr/share/ansible/plugins/modules'] ansible python module location = /usr/local/lib/python3.13/site-packages/ansible ansible collection location = /home/ubuntu/.ansible/collections:/usr/share/ansible/collections executable location = /usr/local/bin/ansible python version = 3.13.2 (main, Apr 8 2025, 01:41:36) [GCC 12.2.0] (/usr/local/bin/python3.13) jinja version = 3.1.6 libyaml = True docker run --rm --name deploy deploy terraform --version OpenTofu v1.9.0 on linux_amd64 docker run --rm --name deploy deploy terraform-backend-git --help Terraform HTTP backend implementation that uses Git as storage Usage: terraform-backend-git [flags] terraform-backend-git [command] Available Commands: completion Generate the autocompletion script for the specified shell docs Generate docs git Start backend in Git storage mode and execute the wrapper help Help about any command stop Stop the currently running backend version Print version Flags: -l, --access-logs Log HTTP requests to the console -a, --address string Specify the listen address (default "127.0.0.1:6061") -c, --config string config file (default is terraform-backend-git.hcl) -h, --help help for terraform-backend-git Use "terraform-backend-git [command] --help" for more information about a command. ```Provisioning a Blank Cloud Server
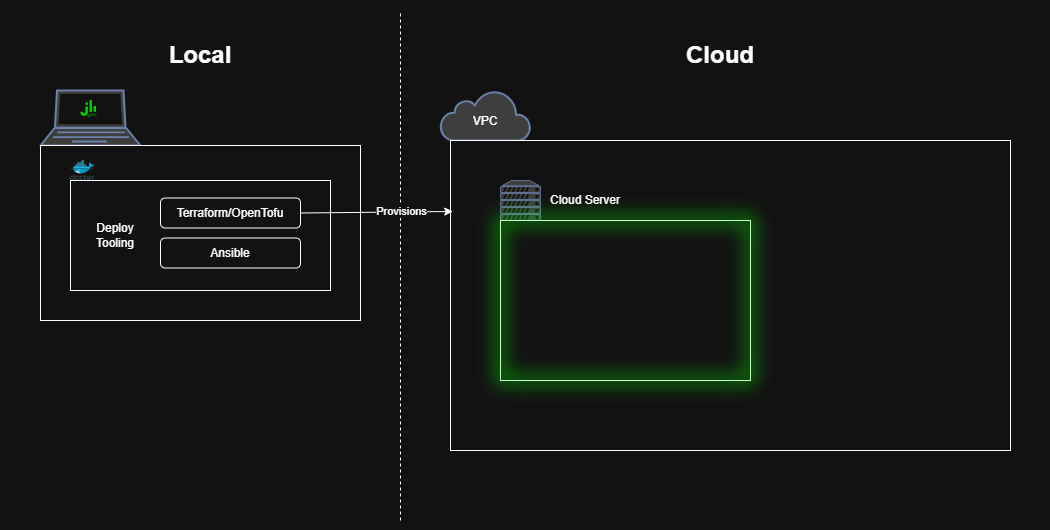
With deployment tools installed, let’s provision a blank cloud server!
Store Terraform State in a Git Repository
First, we need a place to store the Terraform State files, which record a snapshot of the infrastructure managed by Terraform and are a critical part of Terraform’s operation.
State files should be stored in a shared location so that any team member can run deployments. They also need to be guarded by appropriate tools to “lock” the state so that only one deployment can happen at a time. Finally, they need to be stored securely, since they can contain plaintext credentials.
While you can pay for a commercial service to store your Terraform state (e.g. Hashicorp’s own offering), this guide will use the private GitHub repository you created in the pre-requisites.
Using a private git repository for your Terraform state gives you more ownership over the sensitive state files. Additionally, it allows you to run deployments at any time, whereas a commercial provider might have an outage.
But, a private git repository also needs to be protected by appropriate access controls. Feel free to make a different choice for your state management than recommended by this guide.
To do this, create a script that invokes terraform-backend-git to point to your private GitHub repository. (You may also have to chmod +x the file to make it executable)
deploy/terraform.sh
1
2
3
4
5
6
7
8
9
10
11
12
13
14
15
16
17
18
19
20
#!/usr/bin/env bash
cd "$(dirname "$0")"

TERRAFORM_BACKEND_GIT="terraform-backend-git"
REPOSITORY="git@github.com:YOUR_USERNAME/tofu-states.git"
SERVICE_NAME="jenkins"
ARGS=${@: 1}

with_git_backend() {
    # source: https://github.com/plumber-cd/terraform-backend-git#wrapper-mode
    $TERRAFORM_BACKEND_GIT git \
        --repository "$REPOSITORY" \
        --ref main \
        --state "$SERVICE_NAME/tofu.tfstate" \
        "$@"
}

COMMAND="with_git_backend terraform $ARGS"
echo "Running: $COMMAND"
$COMMAND
Make sure to change the value of the REPOSITORY variable to the SSH endpoint for your private GitHub repository.
Also, save the private key portion of your GitHub SSH key to creds/github_key
creds/github_key
1
2
3
-----BEGIN OPENSSH PRIVATE KEY-----
... redacted ...
-----END OPENSSH PRIVATE KEY-----
Additionally, to improve security, create a file containing the SSH fingerprints of GitHub’s servers to defeat man-in-the-middle attacks.
deploy/ssh_known_hosts
1
2
3
4
5
# GitHub.com
# https://docs.github.com/en/authentication/keeping-your-account-and-data-secure/githubs-ssh-key-fingerprints
github.com ssh-ed25519 AAAAC3NzaC1lZDI1NTE5AAAAIOMqqnkVzrm0SdG6UOoqKLsabgH5C9okWi0dh2l9GKJl
github.com ecdsa-sha2-nistp256 AAAAE2VjZHNhLXNoYTItbmlzdHAyNTYAAAAIbmlzdHAyNTYAAABBBEmKSENjQEezOmxkZMy7opKgwFB9nkt5YRrYMjNuG5N87uRgg6CLrbo5wAdT/y6v0mKV0U2w0WZ2YB/++Tpockg=
github.com ssh-rsa AAAAB3NzaC1yc2EAAAADAQABAAABgQCj7ndNxQowgcQnjshcLrqPEiiphnt+VTTvDP6mHBL9j1aNUkY4Ue1gvwnGLVlOhGeYrnZaMgRK6+PKCUXaDbC7qtbW8gIkhL7aGCsOr/C56SJMy/BCZfxd1nWzAOxSDPgVsmerOBYfNqltV9/hWCqBywINIR+5dIg6JTJ72pcEpEjcYgXkE2YEFXV1JHnsKgbLWNlhScqb2UmyRkQyytRLtL+38TGxkxCflmO+5Z8CSSNY7GidjMIZ7Q4zMjA2n1nGrlTDkzwDCsw+wqFPGQA179cnfGWOWRVruj16z6XyvxvjJwbz0wQZ75XK5tKSb7FNyeIEs4TT4jk+S4dhPeAUC5y+bDYirYgM4GC7uEnztnZyaVWQ7B381AK4Qdrwt51ZqExKbQpTUNn+EjqoTwvqNj4kqx5QUCI0ThS/YkOxJCXmPUWZbhjpCg56i+2aB6CmK2JGhn57K5mj0MNdBXA4/WnwH6XoPWJzK5Nyu2zB3nAZp+S5hpQs+p1vN1/wsjk=
And add that file to the deployment docker image.
deploy/Dockerfile
1
2
3
4
5
6
7
WORKDIR /home/ubuntu

+ ## Add SSH known_hosts
+ RUN mkdir -p /home/ubuntu/.ssh
+ COPY ./ssh_known_hosts /home/ubuntu/.ssh/known_hosts

CMD [ "tail", "-f", "/dev/null" ]
Next, update the Makefile to reference this new script, the GitHub SSH key, and the SSH fingerprints when running the deployment image.
Makefile
1
2
3
4
5
6
7
8
9
10
11
12
13
14
15
# ... earlier portion of the Makefile

define deployer
docker run --rm --name deploy -it \
	--volume ./deploy/creds/github_key:/home/ubuntu/.ssh/id_rsa \
	--volume ./deploy/:/home/ubuntu/deploy \
	deploy
endef

jenkins: build-deploy-image
	$(deployer) ./deploy/terraform.sh init
	$(deployer) ./deploy/terraform.sh apply

jenkins-destroy: build-deploy-image
	$(deployer) ./deploy/terraform.sh destroy
How it works
These updates include mounting in the entire
deployfolder containing theterraform.shscript. Later in the guide we’ll add more deployment scripts to thedeployfolder so they will be included in this volume automatically.The
github_keyis mounted to the default SSH private key location so thatterraform-backend-gitcan find it automatically.Additionally, the Makefile defines a new
jenkinstarget that, after completing this guide, will deploy the Jenkins server. It also adds ajenkins-destroytarget which will remove all Jenkins-related cloud infrastructure (e.g. to clean up/save costs if you’re following this guide as an experiment/tutorial).
You could place the
github_keysomewhere else, on your machine and/or within the container. If you make such a change, add a Docker environment variable calledSSH_PRIVATE_KEYcontaining the absolute path to the GitHub SSH private key within the container.
Create the Cloud Server via Terraform
This portion of the guide will focus on provisioning an EC2 server instance on AWS. If you want to deploy to a different cloud provider you can search the OpenTofu Registry or the Terraform Registry for modules/documentation that support your preferred cloud provider.
Now that we have a secure location to store the Terraform state, we can begin writing the code to provision our infrastructure.
Create the file deploy/terraform.providers.tf and add the dependency on your cloud provider – here AWS – and any required global configuration for that provider.
deploy/terraform.providers.tf
1
2
3
4
5
6
7
8
9
10
11
12
terraform {
  required_providers {
    aws = {
      source  = "hashicorp/aws"
      version = "~> 5.0"
    }
  }
}

provider "aws" {
  region = "us-west-2"
}
For AWS, we need to look up the VPC (“Virtual Private Cloud”) where our server should be deployed. For this guide, we’ll use the default VPC that Amazon auto-creates in every new account. Create a new file to store these data lookups.
deploy/terraform.data.tf
1
2
3
4
# Data (lookup from live infrastructure)
data "aws_vpc" "default" {
  default = true
}
We also need an AMI (“Amazon Machine Image”) id to use as the base VM (“virtual machine”) for our new server. We’ll lookup the latest available Ubuntu 24.04 LTS.
deploy/terraform.data.tf
1
2
3
4
5
6
7
8
9
10
11
12
13
14
15
16
17
18
19
20
data "aws_ami" "ubuntu" {
  # This block is adapted from the docs:
  # https://registry.terraform.io/providers/hashicorp/aws/latest/docs/resources/instance.html
  most_recent = true
  owners      = ["amazon"]
  # owners = ["099720109477"] # Canonical - not free tier eligible

  filter {
    name   = "name"
    ## How to find the AMI name? Ask the AWS CLI...
    # docker run --rm -it -v ~/.aws:/path/to/.aws --entrypoint bash amazon/aws-cli
    # aws ec2 describe-images --region us-west-2 --filters "Name=name, Values=*ubuntu-*-24.04-amd64-server-*" | grep \"Name
    values = ["ubuntu/images/hvm-ssd-gp3/ubuntu-*-24.04-amd64-server-*"]
  }

  filter {
    name   = "virtualization-type"
    values = ["hvm"]
  }
}
Now let’s create another file, deploy/terraform.server.tf for our server provisioning code. Add the configuration block to create a new EC2 server instance. Here we’ll use a t3.micro sized server with 8 GB of storage to stay within AWS’s free tier. We’ll also enable the user_data_replace_on_change option to make it easier to recreate the server instance later on in the guide.
deploy/terraform.server.tf
1
2
3
4
5
6
7
8
9
10
11
12
13
14
15
resource "aws_instance" "server" {
  ami             = data.aws_ami.ubuntu.id
  instance_type   = "t3.micro"
  root_block_device {
    volume_size = 8 # GiB
    volume_type = "gp3"
  }
  tags = {
    Name = "jenkins"
  }
  user_data_replace_on_change = true
  lifecycle {
    create_before_destroy = true
  }
}
We also need to ensure our deployment tools image has access to the AWS credentials created in the Pre-requisites.
Create the file creds/aws with the credentials
creds/aws
1
2
3
[default]
aws_access_key_id = YOUR_ACCESS_KEY_ID
aws_secret_access_key = YOUR_SECRET_ACCESS_KEY
And mount that file into the deployment tools container.
Makefile
1
2
3
4
5
6
7
define deployer
docker run --rm --name deploy -it \
+	--volume ./deploy/creds/aws:/home/ubuntu/.aws/credentials \
	--volume ./deploy/creds/github_key:/home/ubuntu/.ssh/id_rsa \
	--volume ./deploy/:/home/ubuntu/deploy \
	deploy
endef
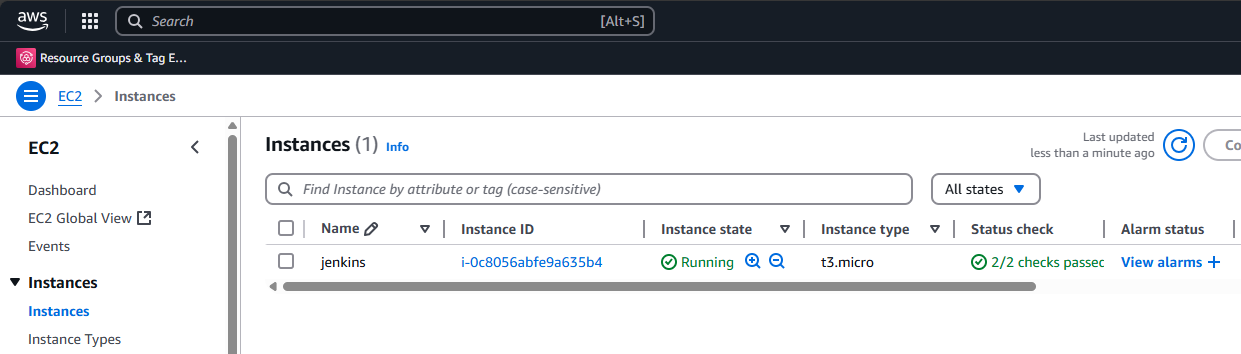
Now you can run make jenkins, and after a few minutes your AWS console will show a new EC2 server!
Enable HTTP and TLS Connections to the Cloud Server
 The newly created EC2 server is currently unable to execute any workloads – it only has a stock OS and, by default all network traffic in and out of the server is blocked. Let’s connect to the internet!
Start by creating a new security group to hold the firewall rules.
deploy/terraform.server.firewall.tf
1
2
3
4
5
6
resource "aws_security_group" "jenkins" {
  name        = "jenkins"
  description = "Firewall rules for the Jenkins server"
  vpc_id      = data.aws_vpc.default.id
  tags        = { Terraform = true }
}
Start by allowing standard network traffic – ports 80 and 443 – through the firewall. We’ll use a locals block to concisely define the ports to avoid excessive repetition of the larger ingress and egress rule blocks.
deploy/terraform.server.firewall.tf
1
2
3
4
5
6
7
8
9
10
11
12
13
14
15
16
17
18
19
20
21
22
23
24
25
26
27
28
29
30
31
32
33
34
35
36
37
38
39
40
41
42
43
44
45
46
47
48
49
50
locals {
  allowed_inbound = [
    { port = 80, description = "HTTP" },
    { port = 443, description = "TLS" },
  ]
  allowed_outbound = [
    { port = 80, description = "HTTP" },
    { port = 443, description = "TLS" },
  ]
}

resource "aws_vpc_security_group_ingress_rule" "allow_ipv4" {
  count             = length(local.allowed_inbound)
  description       = local.allowed_inbound[count.index].description
  security_group_id = aws_security_group.jenkins.id
  cidr_ipv4         = "0.0.0.0/0"
  ip_protocol       = "tcp"
  from_port         = local.allowed_inbound[count.index].port
  to_port           = local.allowed_inbound[count.index].port
}

resource "aws_vpc_security_group_ingress_rule" "allow_ipv6" {
  count             = length(local.allowed_inbound)
  description       = local.allowed_inbound[count.index].description
  security_group_id = aws_security_group.jenkins.id
  cidr_ipv6         = "::/0"
  ip_protocol       = "tcp"
  from_port         = local.allowed_inbound[count.index].port
  to_port           = local.allowed_inbound[count.index].port
}

resource "aws_vpc_security_group_egress_rule" "allow_ipv4" {
  count             = length(local.allowed_outbound)
  description       = local.allowed_outbound[count.index].description
  security_group_id = aws_security_group.jenkins.id
  cidr_ipv4         =  "0.0.0.0/0"
  ip_protocol       = "tcp"
  from_port         = local.allowed_outbound[count.index].port
  to_port           = local.allowed_outbound[count.index].port
}

resource "aws_vpc_security_group_egress_rule" "allow_ipv6" {
  count             = length(local.allowed_outbound)
  description       = local.allowed_outbound[count.index].description
  security_group_id = aws_security_group.jenkins.id
  cidr_ipv6         =  "::/0"
  ip_protocol       = "tcp"
  from_port         = local.allowed_outbound[count.index].port
  to_port           = local.allowed_outbound[count.index].port
}
Finally, link the security_group to the server so the firewall rules take effect.
deploy/terraform.server.tf
1
2
3
4
5
6
7
8
9
10
11
12
13
resource "aws_instance" "server" {
  ami             = data.aws_ami.ubuntu.id
  instance_type   = "t3.micro"
+ vpc_security_group_ids = [aws_security_group.jenkins.id]
  root_block_device {
    volume_size = 8 # GiB
    volume_type = "gp3"
  }
  tags = {
    Name = "jenkins"
  }
  user_data_replace_on_change = true
}
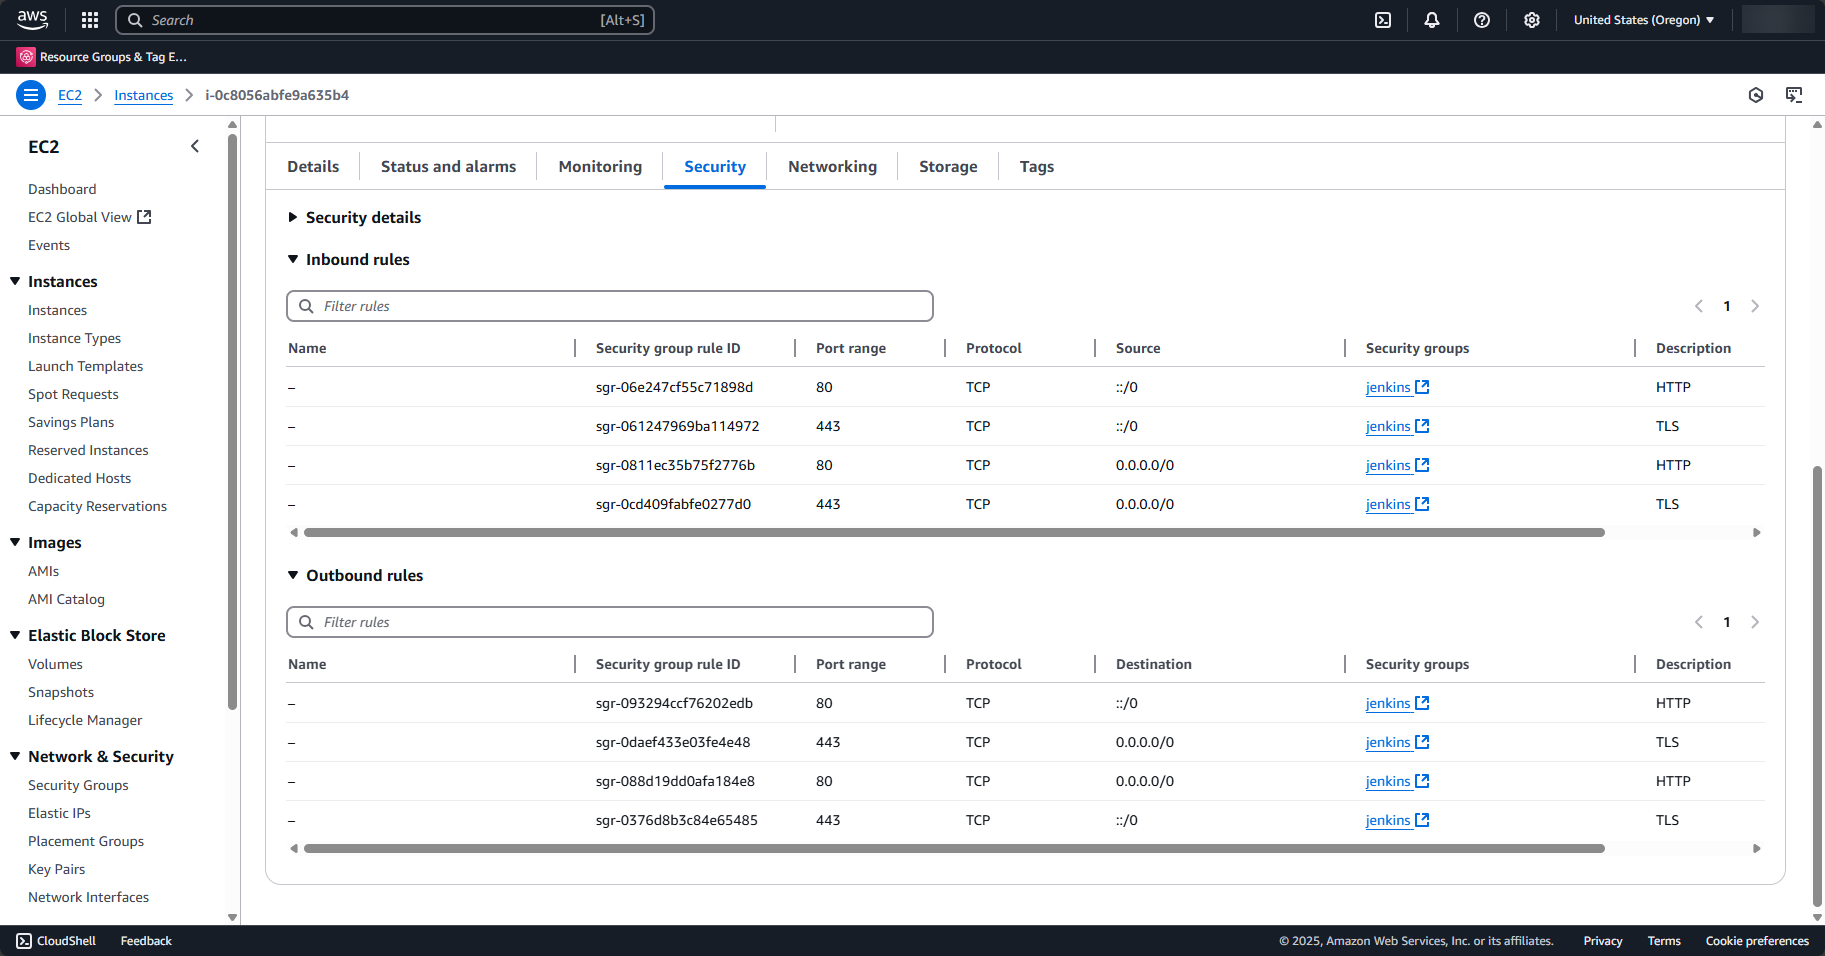
After rerunning make jenkins you should see the firewall rules listed in the EC2 server’s Security tab.
Enable SSH Connections to the Cloud Server
 The server also needs to support SSH access so that, later on, Ansible can connect to and configure the server.
Add firewall rules to allow incoming SSH traffic.
deploy/terraform.server.firewall.tf
1
2
3
4
5
6
7
8
9
10
11
12
13
14
15
16
17
resource "aws_vpc_security_group_ingress_rule" "allow_ssh_ipv4" {
  description       = "SSH"
  security_group_id = aws_security_group.jenkins.id
  cidr_ipv4         = "0.0.0.0/0"  # WARNING: Wide open SSH
  ip_protocol       = "tcp"
  from_port         = 22
  to_port           = 22
}

resource "aws_vpc_security_group_ingress_rule" "allow_ssh_ipv6" {
  description       = "SSH"
  security_group_id = aws_security_group.jenkins.id
  cidr_ipv6         = "::/0"   # WARNING: Wide open SSH
  ip_protocol       = "tcp"
  from_port         = 22
  to_port           = 22
}
Allowing inbound traffic on port 22 from
0.0.0.0/0means anyone in the world can attempt to SSH into your server. While that setting is useful in a public guide like this one, you should restrict that down much further, e.g.your.ip.addr.ess/32, for a polished production deployment.
Place the new SSH key pair from the pre-requisites into the creds folder.
_deploy/creds/cloud_server_key.pub
1
ssh-rsa ... redacted ... user@hostname
deploy/creds/cloud_server_key
1
2
3
-----BEGIN OPENSSH PRIVATE KEY-----
... redacted ...
-----END OPENSSH PRIVATE KEY-----
Add a local_file block to access the public key’s contents within Terraform.
deploy/terraform.data.tf
1
2
3
data "local_file" "ssh-public-key" {
  filename = "./creds/cloud_server_key.pub"
}
Add a server boot script that will install the public key as an authorized SSH key. For AWS EC2 servers, that is accomplished by adding a user_data script.
deploy/terraform.server.tf
1
2
3
4
5
6
7
8
9
10
11
12
13
14
15
16
17
18
19
20
resource "aws_instance" "server" {
  ami             = data.aws_ami.ubuntu.id
  instance_type   = "t3.micro"
  vpc_security_group_ids = [aws_security_group.jenkins.id]
  root_block_device {
    volume_size = 8 # GiB
    volume_type = "gp3"
  }
  tags = {
    Name = "jenkins"
  }
  user_data_replace_on_change = true
+  user_data                   = <<-SERVER_INIT_SCRIPT
+    #!/bin/bash
+    echo "${data.local_file.ssh-public-key.content}" > /home/ubuntu/.ssh/authorized_keys
+  SERVER_INIT_SCRIPT
  lifecycle {
    create_before_destroy = true
  }
}
Finally, let’s require Terraform to validate that the server is accessible over SSH.
Add a terraform_data block with a provisioner to execute a simple echo command on the cloud server via SSH.
deploy/terraform.server.tf
1
2
3
4
5
6
7
8
9
10
11
12
13
14
15
16
17
18
19
20
21
resource "terraform_data" "server-configuration" {
  input = {
    "id" = aws_instance.server.id
    "public_ip" = aws_instance.server.public_ip
  }
  triggers_replace = [
    aws_instance.server.id,
    timestamp(),  # Trigger provisioner re-runs on every Terraform `apply`
  ]
  lifecycle {
    create_before_destroy = true
  }
  provisioner "remote-exec" {  # Ensure SSH is ready
    connection {
      host = aws_instance.server.public_ip
      user = "ubuntu"
      private_key = file("./creds/cloud_server_key")
    }
    inline = ["echo 'Instance is now reachable via SSH!'"]
  }
}
Now, when you run make jenkins, Terraform will both create the cloud server and ensure that it is accessible via SSH!
Output of `make jenkins`
```bash $ make jenkins ... (truncated Terraform output) terraform_data.server-configuration: Provisioning with 'remote-exec'... terraform_data.server-configuration (remote-exec): Connecting to remote host via SSH... terraform_data.server-configuration (remote-exec): Host: xxx.xxx.xxx.xxx terraform_data.server-configuration (remote-exec): User: ubuntu terraform_data.server-configuration (remote-exec): Password: false terraform_data.server-configuration (remote-exec): Private key: true terraform_data.server-configuration (remote-exec): Certificate: false terraform_data.server-configuration (remote-exec): SSH Agent: false terraform_data.server-configuration (remote-exec): Checking Host Key: false terraform_data.server-configuration (remote-exec): Target Platform: unix terraform_data.server-configuration (remote-exec): Connected! terraform_data.server-configuration (remote-exec): Instance is now reachable via SSH! ```Deploying Jenkins to the Cloud Server
Now that the cloud server has shiny SSH access, let’s setup Ansible to configure the server.
Hello Ansible
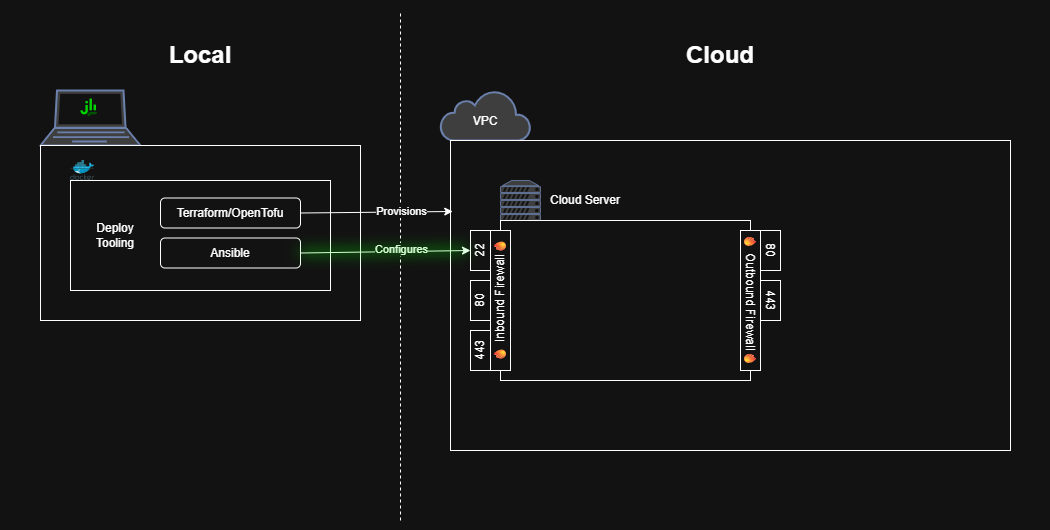 Create an Ansible playbook that pings the remote server to test Ansible’s connectivity.
deploy/ansible.playbook.yaml
1
2
3
4
5
- name: Test Ansible Connection
  hosts: all
  tasks:
    - name: Ping the cloud server
      ansible.builtin.ping:
Add a second provisioner to the terraform_data block that invokes Ansible to run the playbook against the cloud server.
deploy/terraform.server.tf
1
2
3
4
5
6
7
8
9
10
11
12
13
14
15
16
17
18
19
20
21
22
23
24
25
26
27
28
29
30
31
32
33
34
35
36
37
38
39
40
41
42
resource "terraform_data" "server-configuration" {
  input = {
    "id" = aws_instance.server.id
    "public_ip" = aws_instance.server.public_ip
  }
  triggers_replace = [
    aws_instance.server.id,
    timestamp(),  # Trigger provisioner re-runs on every Terraform `apply`
  ]
  lifecycle {
    create_before_destroy = true
  }
  provisioner "remote-exec" {  # Ensure SSH is ready before running Ansible
    connection {
      host = aws_instance.server.public_ip
      user = "ubuntu"
      private_key = file("./creds/cloud_server_key")
    }
    inline = ["echo 'Instance is now reachable via SSH!'"]
  }
+  provisioner "local-exec" {  # Run Ansible to configure the server
+    environment = {
+      "SSH_PRIVATE_KEY_PATH" = "./creds/cloud_server_key"
+    }
+    # NOTE: Prefer `--ssh-extra-args` over `ANSIBLE_HOST_KEY_CHECKING`
+    # - Requires Ansible to validate known hosts (e.g. GitHub).
+    # - Allows Ansible to connect to newly provisioned servers.
+    # NOTE: Pass `--inventory` as a comma-separated list instead of a
+    # file since only one server is targeted.
+    command = <<-SERVER_CONFIG_SCRIPT
+      echo "Running Ansible from directory $(pwd)"
+      ansible-playbook \
+        --verbose \
+        --user=ubuntu \
+        --private-key=$SSH_PRIVATE_KEY_PATH \
+        --ssh-extra-args='-o StrictHostKeyChecking=accept-new' \
+        --become \
+        --inventory='${aws_instance.server.public_ip},' \
+        ansible.playbook.yaml
+    SERVER_CONFIG_SCRIPT
+  }
}
How it works
Provisioners are run sequentially, so the
remote-execwill ensure the cloud server is accessible via SSH before thelocal-exec’s callout to Ansible attempts the connection.The
environmentsubblock defines environment variables that are available to thecommand. In this case, we are referencing the private counterpart of the SSH key added to the cloud server.
ansible-playbookinstructs Ansible to run the specified playbook, hereansible.playbook.yaml. We provide an in-lineinventorywith the IP address of our new cloud server, which Ansible connects to over SSH as--user=ubuntuauthenticated with the given--private-key. We configure SSH toaccept-newservers since ours is brand new, and thus we don’t know its SSH fingerprint.
Now re-running make jenkins should show Ansible connecting to and pinging the cloud server.
Output of `make jenkins`
```bash $ make jenkins ... (truncated output) terraform_data.server-configuration (local-exec): TASK [Ping the cloud server] *************************************************** terraform_data.server-configuration (local-exec): ok: [xxx.xxx.xxx.xxx] => {"changed": false, "ping": "pong"} terraform_data.server-configuration (local-exec): PLAY RECAP ********************************************************************* ... (truncated output) ```Configuring the Cloud Server as a Jenkins instance
 Now, we can configure Ansible to install Jenkins!
Use Ansible to Install Docker on the Cloud Server
First, we need Ansible to install Docker on the cloud server. We’ll use some third-party Ansible modules to handle this task.
Create an Ansible requirements file to list the third-party dependencies.
deploy/ansible.requirements.yaml
1
2
3
4
5
roles:
  - src: geerlingguy.pip
    version: 3.1.0
  - src: geerlingguy.docker
    version: 7.4.5
Update the Terraform provisioner to install the Ansible requirements before running the playbook.
deploy/terraform.server.tf
1
2
3
4
5
6
7
8
9
10
11
12
13
14
15
16
17
18
19
20
21
22
23
24
25
26
resource "terraform_data" "server-configuration" {
  ...
  provisioner "local-exec" {  # Run Ansible to configure the server
    environment = {
      "SSH_PRIVATE_KEY_PATH" = "./creds/cloud_server_key"
    }
    # NOTE: Prefer `--ssh-extra-args` over `ANSIBLE_HOST_KEY_CHECKING`
    # - Requires Ansible to validate known hosts (e.g. GitHub).
    # - Allows Ansible to connect to newly provisioned servers.
    # NOTE: Pass `--inventory` as a comma-separated list instead of a
    # file since only one server is targeted.
    command = <<-SERVER_CONFIG_SCRIPT
+	  echo "Installing Ansible Requirements"
+     ansible-galaxy install --role-file ansible.requirements.yaml
      echo "Running Ansible from directory $(pwd)"
      ansible-playbook \
        --verbose \
        --user=ubuntu \
        --private-key=$SSH_PRIVATE_KEY_PATH \
        --ssh-extra-args='-o StrictHostKeyChecking=accept-new' \
        --become \
        --inventory='${aws_instance.server.public_ip},' \
        ansible.playbook.yaml
    SERVER_CONFIG_SCRIPT
  }
}
Update the playbook to install pip then docker.
deploy/ansible.playbook.yaml
1
2
3
4
5
6
7
8
9
10
11
12
13
14
15
16
17
18
- name: Install pip
  hosts: all
  tasks:
    - name: Ensure `pip` is installed
      ansible.builtin.apt:
        name: python3-pip
        state: present
        update_cache: true

- name: Install Docker
  hosts: all
  vars:
    pip_install_packages:
      - name: docker
        version: 7.1.0
  roles:
    - role: geerlingguy.pip
    - role: geerlingguy.docker
Run a Jenkins Container on the Cloud Server
Add a playbook step to boot a Jenkins docker container
deploy/ansible.playbook.yaml
1
2
3
4
5
6
7
8
9
10
11
12
- name: Start Jenkins
  hosts: all
  tasks:
    - name: Start Jenkins Container
      community.docker.docker_container:
        name: "jenkins"
        image: jenkins/jenkins:lts-jdk21
        ports:
          - "80:8080"
        state: started
        recreate: true
        restart_policy: unless-stopped
Now, re-run make jenkins, and once everything completes, visit your cloud server’s IP address in your browser to see a running Jenkins instance!
You can obtain the password by using SSH to read the deployed Docker container’s logs
1
2
ssh -i deploy/creds/cloud_server_key ubuntu@xxx.xxx.xxx.xxx \
	sudo docker logs jenkins
OR by reading the initialAdminPassword file from the deployed Docker container.
1
2
3
ssh -i deploy/creds/cloud_server_key ubuntu@xxx.xxx.xxx.xxx \
	sudo docker exec jenkins \
		cat /var/jenkins_home/secrets/initialAdminPassword
But, again, don’t get too attached to this server as it will be automatically replaced whenever a newer OS image is available (e.g. with security updates). To prepare Jenkins for initial production loads, we have to persist the Jenkins state (i.e. jenkins_home) outside of the cloud server.
Persisting the jenkins_home Directory
The jenkins_home directory contains all the key Jenkins state: users, sessions, job configurations, job build histories, plugins, etc. We want to store that state outside of the cloud server so we can update/replace the cloud server as needed (e.g. to fix security vulnerabilities)
Create a Network File Share
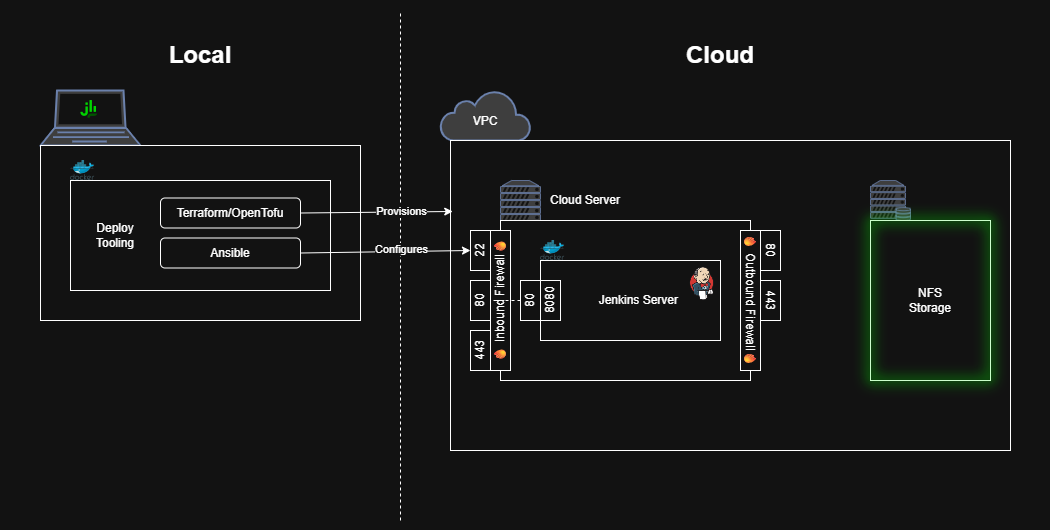 We’ll start by configuring a network file share (e.g. a hard drive you connect to over the internet). For AWS, use the Elastic File Share (EFS) service.
deploy/terraform.nfs.tf
1
2
3
4
5
6
7
resource "aws_efs_file_system" "jenkins-efs" {
  tags = {
    Name      = "jenkins-efs"
    Terraform = true
  }
  encrypted = true
}
For AWS, we don’t need to specify an exact storage amount – the “elastic” branding reflects how the storage expands automatically as needed. The free tier allows up to 5GB.
Allow Traffic to the Network File Share from the Cloud Server
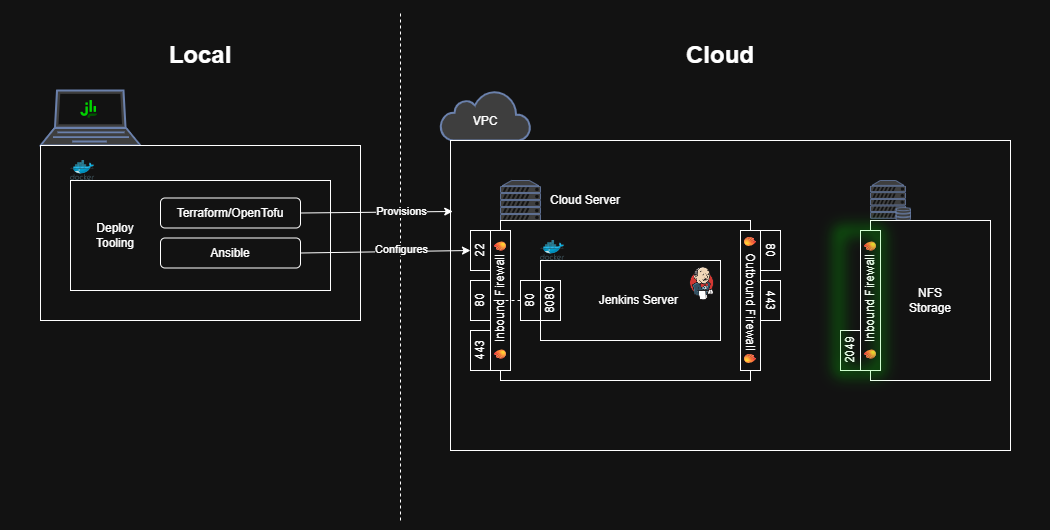 The NFS share also needs firewall rules to allow incoming traffic.
Create a new security group for the NFS that allows incoming traffic on port 2049 (the only port AWS EFS listens on).
deploy/terraform.nfs.firewall.tf
1
2
3
4
5
6
7
8
9
10
11
12
13
14
resource "aws_security_group" "nfs" {
  name        = "nfs"
  description = "Allow incoming NFS traffic (e.g. for Amazon EFS)"
  vpc_id      = data.aws_vpc.default.id
  tags        = { Terraform = true }
}

resource "aws_vpc_security_group_ingress_rule" "allow_nfs_from_jenkins" {
  security_group_id = aws_security_group.nfs.id
  referenced_security_group_id = aws_security_group.jenkins.id
  ip_protocol       = "tcp"
  from_port         = 2049
  to_port           = 2049
}
Notice that the ingress_rule only allows traffic from servers with the jenkins security group – that protects against unwanted access and preserves connectivity even when the Jenkins cloud server’s IP changes (e.g. upon server replacement or the addition of more servers).
The NFS also needs a network mount target, i.e. a network interface that other servers can contact to connect to the file share.
In AWS, we need to first look up all the subnets on our default VPC.
deploy/terraform.data.tf
1
2
3
4
5
6
7
8
9
10
11
12
13
14
data "aws_vpc" "default" {
  default = true
}

+data "aws_subnets" "default" {
+  filter {
+    name   = "vpc-id"
+    values = [data.aws_vpc.default.id]
+  }
+  filter {
+    name   = "default-for-az"
+    values = ["true"]
+  }
+}
Then create a mount target within each subnet.
deploy/terraform.nfs.tf
1
2
3
4
5
6
7
8
9
10
11
12
13
14
15
16
resource "aws_efs_file_system" "jenkins-efs" {
  tags = {
    Name      = "jenkins-efs"
    Terraform = true
  }
  encrypted = true
}

+resource "aws_efs_mount_target" "jenkins-efs" {
+  count          = length(data.aws_subnets.default.ids)
+  file_system_id = aws_efs_file_system.jenkins-efs.id
+  subnet_id      = data.aws_subnets.default.ids[count.index]
+  security_groups = [
+    aws_security_group.nfs.id,
+  ]
+}
How it works
The
countkey tells Terraform to create multiple records and acts like an iterator allowing us toindexeach of thesubnet_ids.
Mount the Network File Share to the Cloud Server
 Now that the NFS allows incoming connections, let’s configure the cloud server to connect to the file share.
Start by allowing outbound traffic to the NFS.
deploy/terraform.server.firewall.tf
1
2
3
4
5
6
7
8
9
10
11
12
13
14
15
# ...

locals {
  allowed_inbound = [
    { port = 80, description = "HTTP" },
    { port = 443, description = "TLS" },
  ]
  allowed_outbound = [
    { port = 80, description = "HTTP" },
    { port = 443, description = "TLS" },
+    { port = 2049, description = "NFS" },
  ]
}

# ...
Pass the NFS’s DNS name to Ansible as an environment variable.
deploy/terraform.server.tf
1
2
3
4
5
6
7
  provisioner "local-exec" {  # Run Ansible to configure the server
    environment = {
      "SSH_PRIVATE_KEY_PATH" = "./creds/cloud_server_key"
+      "JENKINS_NFS_MOUNT_DNS_NAME" = aws_efs_file_system.jenkins-efs.dns_name
    }
    # ...
  }
Also, update the terraform_data block that runs Ansible to have an explicit dependency on the NFS mount targets. Otherwise, Terraform may try to run Ansible to connect to the NFS before the mount targets have been provisioned, which would result in a failed mount.
deploy/terraform.server.tf
1
2
3
4
5
6
7
resource "terraform_data" "server-configuration" {
  input = {
    "id" = aws_instance.server.id
    "public_ip" = aws_instance.server.public_ip
+    "nfs_mounts" = aws_efs_mount_target.jenkins-efs.*.id
  }
  # ...
Then instruct Ansible to mount the NFS to the cloud server.
deploy/ansible.playbook.yaml
1
2
3
4
5
6
7
8
9
10
11
12
13
14
15
16
17
18
19
20
21
22
23
24
25
26
27
- name: Install Docker
  # ...

- name: Mount Network File System
  hosts: all
  tasks:
    - name: Ensure `mount` is installed
      ansible.builtin.apt:
        name: nfs-common
        state: present
    - name: Create NFS mount point
      ansible.builtin.file:
        path: /mnt/nfs
        state: directory
        owner: ubuntu
        group: ubuntu
        mode: '0755'
    - name: Mount NFS
      ansible.posix.mount:
        src: "{{ lookup('ansible.builtin.env', 'JENKINS_NFS_MOUNT_DNS_NAME') }}:/"
        path: /mnt/nfs
        fstype: nfs4
        opts: "nfsvers=4.1,rsize=1048576,wsize=1048576,hard,timeo=600,retrans=2"
        state: mounted

- name: Start Jenkins
  # ...
Persist jenkins_home inside the Network File Share
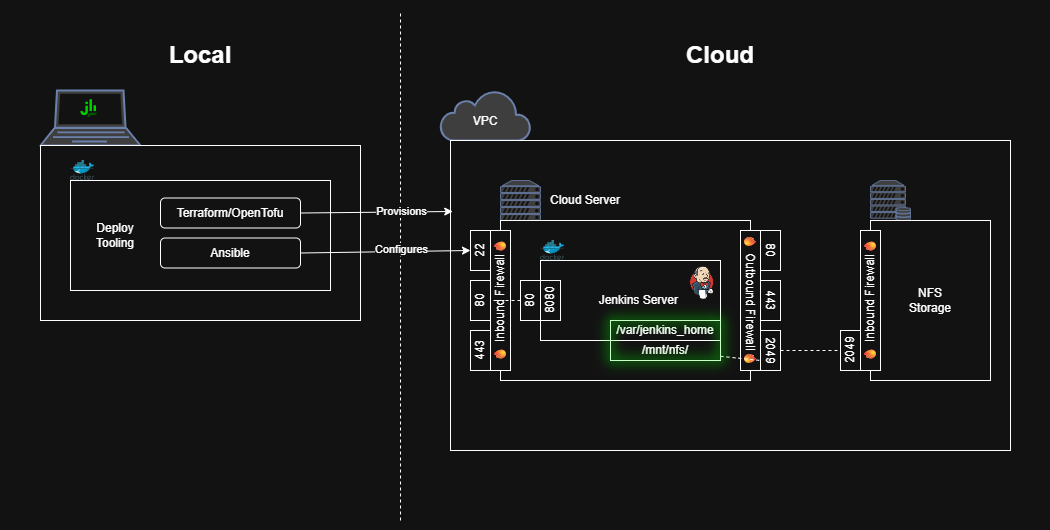 Now that the cloud server has access to the NFS storage, let’s persist the
 jenkins_home directory inside it.
Create a jenkins_home directory within the NFS.
deploy/ansible.playbook.yaml
1
2
3
4
5
6
7
8
9
10
11
- name: Mount Network File System
  hosts: all
  tasks:
    # ... all other tasks
    - name: Create `jenkins_home` directory
      ansible.builtin.file:
        path: /mnt/nfs/jenkins_home
        state: directory
        owner: ubuntu
        group: ubuntu
        mode: '0755'
Finally, mount the NFS’s jenkins_home into the Jenkins container
deploy/ansible.playbook.yaml
1
2
3
4
5
6
7
8
9
10
11
    - name: Start Jenkins Container
      community.docker.docker_container:
        name: "jenkins"
        image: jenkins/jenkins:lts-jdk21
        ports:
          - "80:8080"
+       volumes:
+         - /mnt/nfs/jenkins_home:/var/jenkins_home
        state: started
        recreate: true
        restart_policy: unless-stopped
Now, with one last make jenkins, you’ll have a working Jenkins server backed by a reliable deployment pipeline.
Conclusion/Next Steps
At this point, you can log into the Jenkins server and begin setting it up through the UI to install plugins, configure jobs, credentials, etc. It’s also possible to manage all this configuration through code (to be continued in a future guide).
You’ll also want to configure HTTPS before using this Jenkins server for production workloads. Use your preferred service to obtain a (sub)domain and enable HTTPS. I like buying domains through Cloudflare and using Let’s Encrypt to obtain a free HTTPS certificate. If you want to stay within the AWS ecosystem, you can buy a domain in Route 53 and configure HTTPS with the help of the AWS Certificate Manager (ACM).
I hope you found this guide helpful and informative. Please leave a comment below sharing something you learned or asking a question if anything was unclear.
If you were following this guide just to explore cloud development and/or Jenkins deployment, consider running
make jenkins-destroyto permanently delete all Jenkins data and infrastructure (e.g. to keep the cloud organized and avoid unnecessary costs).